Personal Equipment:
Base Layers
2 X Base layer tops
2 X Long Johns
For wool base layers (including long johns) the very best available are the Devold Expedition range, but a bit pricey at about £50 per item – They don’t normally mail order, but if you phone and ask really, really, nicely… www.norwegianstore.com
Avoid the Icebreaker products, as they have become so popular they have moved their productions operation from New Zealand to China, and subsequently the product quality has dropped dramatically, mainly due to the heavy use of bleach in the mass production (which didn’t happen in NZ).
Ullfrotte will be perfect, or another excellent alternative is the Janus merino base layers made in Norway – without bleach – which look the same, are a lot cheaper and are considerably warmer.
Mid-Layers
1 X Wool Trousers
My personal choice are the Fallschirmjager Jump Trousers (parachute trousers) 70% wool for £ 73, I particularly like the venting flaps down the side of the legs that pump out warm air as you walk, helping to keep you cool. The only down side are the tiny pockets – I cut mine out and sew in a couple of big, deep pockets that I made from polartec fleece (bought at a fabric shop).
3 x Wool mid-layers – Jumpers / Wool Shirts / Fleeces
Sized to be worn one over the other, in light, medium, and heavy weights. Woollen jumpers (especially the ones with ribbed ridges to trap extra air) are good too. If you are a very hot person, you should get away with a mid-weight shirt and a heavy jumper.
Wind (& Rain) Layers
To be worn over wool mid-layers in windy conditions.
1 X Wind Smock
A good option is the heavy canvas ‘Swedish Hooded Windproof Snow Smock’, usually around £20 or the ‘Norwegian Snow Suit’ consisting of a lighter parka smock and trousers coming in at about £20 for both – search for them on ebay. The smocks can be ‘pimped’ old fur ruffs from an antique store for trimming the hood, you can also ‘pimp’ it up with patterned canvas strips around the hems and cuffs. I’ve further modifies my parka by stitching some fleece onto the inside of the collar, where it touches my chin (as the cold canvas rubbed irritated some old scar tissue from when I split my chin when I was a kid), I’ve also added some big ‘pit zips’ so I can vent the jacked when walking.
The ultimate is the Empire Canvas Arctic Anorak – but be warned, they don’t come cheap.
1 X Wind Pants
For wind pants rain pants can serve in a pinch, but won’t breath, and skier’s warm-up pants work. Full side-zippers allow them to be put on or removed while wearing snowshoes. Preferably opt for the Norwegian trousers above or the German Army Snow Pants at £12.99 or try the Paramo Aspira Trousers as they breathe fast.
Again the Empire Canvas permafrost pants are the best, but pricey.
Make sure you can comfortably fit in the parka with all your layers on!
1 X Long Scarf – long enough to wrap face and ears in extreme cold or wind, also for wearing round your parka as a waist belt.
1 X Bandana or Buff- primarily as nose wiping equipment during the day and nose warming equipment at night
1 X Rain Gear (jacket and pants) – We hope to never need these, but if we do, we’ll really need them. Good for building snow shelters.
Hats
1 X light wool or synthetic hat that breathes fast so is perfect to stop overheating when hauling on the trail, any will do…something like this is perfect.
Another alternative is the 70’s style knitted headband to keep ears warm when a full hat is too hot, and as a nose warmer at night in the sleeping bag.
And then a more serious cold weather hat is good for base camp work; I like the Harkila Alaska Down Hat at around £45, as it breathes much faster than a gortex-type hat, so it doesn’t get sweaty and consequently cold. They come up small in size; I am an XXL
Gloves
Do not bring gloves, mittens are much warmer, bring a big safety pin to hang them up together in the tent.
1 x Pair wool mittens with leather ‘chopper” mitt shells – Oven-mitt shells can be purchased from Ray Mears for £12, as can some Ullfrotte liners at £28
A spare set of liners is not over-doing things for back up, or having a different weight for extreme cold.
Empire canvas’ true north mitts are perfect or Steger’s Arctic Mitts.
I’m a big fan of the old school Lackner’s Dachstein woolen mittens which are excellent for chopper liners £25
Or make your own – http://www.nativetech.org/clothing/mittens/mitteninstr.html
Boiled wool blankets can be used for liners – they are so simple to make, even I have managed! I soaked mine in water and ironed them at the wrists so I could stretch them for easy on and off and then stitched them over my Dachsteins for super toasty fingers.
If you suffer from really cold fingers, try the Rab Expedition Mitts for ultimate warmth.
Insulation Layer
1 x Down or synthetic filled parka. This should be carried in it’s own stuff sack for easy access during the day for lunch stops.
Most of this gear can be sourced fairly cheaply (or even handmade), but three things you don’t want to skimp on are good socks, a good sleeping bag and a good puffer jacket. Be aware the USA and UK down fill ratings are slightly different (see note in sleeping bags section).
There are lots of ‘puffer’ jackets out there and good deals to be had in the January sales (the later you wait to the end of the European Ski season, the better the deals get), so good options would be jackets like the – Rab Neutrino Endurance and Mountain Equipment Xero Jacket
Footwear
2 pairs felt boot liners. If you have trouble finding these Steger Mukluks has some of the best.
2 pairs 100% wool insoles one size smaller than the liners, to be inserted to double sole thickness. (Can be trimmed to fit with scissors).
5 x Pairs of Good Quality Merino Wool Socks (use with silk or synthetic liner socks if you can’t wear wool directly on skin.) Go for a high wool content 70 – 80% is ideal, avoid Icebreakers like the plague – I like the cheap Kirkland’s at less than £5 / pair!
2 X Nylon Mesh Insoles (optional) – On Tim Smith’s (Jack Mountain Bushcraft) advice I tried a pair of these insoles last year and stitched them to my felt insoles. They worked beautifully, circulating air and increasing insulation – helping to prevent moisture from building up on the bottom of the boot liner.
1 x Tingley rubber over boots – for slipping on over your felt liners for camplife, wher you are in and out of tents.
Sleeping System
Sleeping bag, preferably a good quality expedition / 4 season bag (or two 3 season bags)
European down is best as it is sourced in Eastern Europe and it is cleaned thoroughly before use, so removing nearly all of the “bird dandruff” that makes some people allergic to down. This is not always the case with many Far Eastern sourced bags (especially cheaper ones).
Fill-Power: is a measure of the loft that the fill produces. Due to different measuring methods used, USA fill powers show higher figures than European ones for the same down. Here is an approximate comparison chart for fill powers:
Euro Fill-power Equivalent USA Fill-power
750+ 850+
660+ 725+
560+ 610+
Mountain Equipment Everest 1250 bag £585 (Shop around on ebay!!)
The current rising stars of the sleeping bag world are the new Tundra range – I’d heartily recommend the Tundra Pure & Dry –40 Bag coming in at £550
For anyone with a down allergy I think the best of the synthetic options is the Ajungilak Denali 5 Season Sleeping Bag at about £190, but I think I might want to take a smaller top-up bag (just in case).
1 X Full-length self-inflating sleeping mat and 1 X full-length closed-cell foam mat
I would recommend a Multimat Expedition Extreme Roll Mat for £17 as the close-cell
Eye Protection
Any decent polarized sunglasses are fine.
And for goggles, any decent brand will do, as hopefully you won’t be using them very much, so go for something like Bolle, Cebe, Bloc, etc. Head for TK Maxx après-Christmas for some good deals on top brand ski & snowboardwear.
Carrying System
1 X Rucksack or hybrid travel pack (you will not have to hike with it)
This is for travelling and can be stored at the Conover’s, where you will be issued with an expedition duffel bag.
1 x Daypack, to be lashed to top of loads with all small frequently used items and extras for ready access, and use on side trips on layover days. It’s a good idea to bring a couple of bungee straps
Sun Protection System
o Sun block
o Lip balm
Lighting / Location System
o Head torch (and spare batteries)
o Whistle
Water System
o Micro filter, Iodine drops or Chlorine Dioxide tablets
o 1 x 1 lt water bottle (I like the Sigg Bottles with the Neoprene insulating pouch, ou can always just insulate your bottle in a couple of socks. Your bottle needs agood seal, as you’ll be wearing it under your clothes, ideally upside down to stop an iceplug foring in the neck)
o 1 x 1lt thermos flask
First Aid System
o Small first aid kit, including safety pins, plasters, blister kit, tweezers, foot powder and any personal medication
o Emergency food e.g. a power bar
Tool System
o A fixed blade sheath knife
Hygiene System
o Wash kit, preferably containing biodegradable soap, wet wipes, ear plugs.
o Towel and swim wear
o Sanitary products
It is also good idea to bring a foam sit-mat to keep your bums warm at lunch breaks.
Optional Extras
Notebook and pencils
Sewing kit
Camera
Binoculars
10 meters of parachute cord
Folding saw
Large Ziploc Bags
Gaffa Tape
Mobile phone
Gransfors – Small forest axe (if you wish to use one)
Extra Notes/ Clarification re: Gear Lists
Clothing Material Choices
The best clothing material choices for traditional winter camping are generally natural fibres such as wool, leather and canvas. Your insulating layers (ie. All warm layers worn under your outer ‘shell’) should be made up of wool or synthetic materials such as polyester (“fleece”) or polypropylene, wool is prefered. You should not be wearing any cotton clothing as an insulating layer.
Your best outer shell material is both windproof and breathable. A tightly woven cotton canvas
pullover is the best, as it is both windproof and highly breathable.
The very best outer shell is a canvas anorak which has a nice fur-trimmed hood and extends
down to mid-thigh. With an anorak like this (and proper insulating layers underneath), you
will be comfortable in the windiest of conditions.
Waterproofness is rarely required or desired in the winter. In cold, dry conditions, non- waterproof materials (“breathable” material) are best as they allow your sweat to evaporate, and will keep you drier and warmer than waterproof gear.
Leather is a great outerwear option in places which see a lot of abrasion, such as gloves, mittens and moccasins. Again, they are windproof and breathable, but also very durable, have a great grip on tool handles and not apt to melt around the fire.
Sleeping Bags
Down or synthetic sleeping bags are both fine for traditional winter camping. Down is best because of its lightness and durability, but synthetic is more affordable. Drying sleeping bags is easy in the heated tent, so choose whatever your budget will allow if buying a new bag. Alternatively, you may pair two 3-season bags to have a warm enough night-time setup.
Most nights, the woodstove will be kept running all night, meaning you will frequently be sleeping in comfort with your bag partially open.
Footwear
Footwear should be sized to accommodate enough insulation to keep you warm while standing still at -20 degrees. This is more insulation than you may think:
1 – 3 pairs of thick wool socks
Thick felt insole
Thick felt liner
Mountaineering/ skiing or hiking boots are not adequate. They are too tight-fitting and restrict blood flow.
If wearing moccasins or other breathable footwear, it is a good idea to bring along a separate pair of waterproof (rubber) boots in case of encountering thaw conditions. An alternative is to temporarily waterproof your moccasins by putting plastic bags inside – ensure you bring an adequate supply of durable plastic bags.
Duffels
Any relatively small duffel which will accommodate everything you are trying to pack into it will do. Keep it light and simple: no frames, no shoulder straps. In our experience it is most convenient to have two small duffels: one for sleeping items which you will use every night, and another one for backup items which you may only need occasionally. As stated, a daypack will be provided for items you will don and doff throughout the day.
MEC-brand duffels are great for this use (and storage around the house too). Two small MEC duffels, or 1 small and 1 medium should suffice (depending on how big your sleeping bag is).
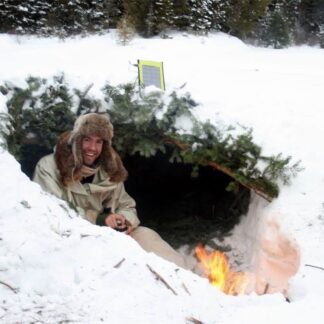
Inflatable Sleeping Pads and Spruce Boughs
We often use conifer boughs as part of our tent floor. These make an exceptional floor in a traditional winter tent, but can wreak havoc on modern inflatable sleeping pads. We personally only use closed cell foam (non-inflatable) pads for ourselves, though many guests still successfully use inflatable pads with some extra care and discretion.


Reviews
There are no reviews yet.